
 In this posting I'll give a little overview of how I started weaving this pattern and give the details of how I tablet weave (how I set the warp up, how I interpret the pattern etc).
The end-result of this belt you can see on the picture beside the text. The rolled one is the last and best result. The length of this belt is around 2,2o m -- in other words, if I had indeed used it as a band for my plaid/rectangular cloak, it would have been only for one side. In Kiruvere I used this one as a belt instead...
Namely, as you can see from the picture below, I made three belts with this pattern. At first I had this vision -- to hem 2 sides of the plaid with "green" band and 2 with "orange" one. In the next photo you can see my progress within a week of weaving:
 The one in the right is the first one I made. The middle one with green is my second attempt. And the one in the left is my last and best attempt.
It has tinier dots at the edges because I turned the "edge-tablets" always in the same direction (no 4 back, 4 forth). I didn't use this trick during previous attempts here. But as you can see, it gave me indeed a better result. The weave is a bit thicker, holds together better, I think. And the edges are straighter. So I sacrificed dashes for dots.
Talking about colors... Can't decide which combo I like the best -- with green or with orange. Both are beautiful. For Kiruvere I stiched the last orange belt and the green one together, because I had too little time to make myself a belt. So instead of adorning my plaid, I used the "bands" as a loooong belt. I rather liked this jokerish belt -- this way I could admire both combos :).
Making of... and different tablet weaving systems (NB!)
As every tabletweaver knows, the most frustrating part of tabletweaving is setting the weave up. Once the weave is set up, it's pure joy -- at least with patterns like this.
The pattern I chose is one-sided and is regular. Meaning, the principle of this pattern is easy -- turn the tablets 4 times in one direction and then 4 times in the opposite direction (http://www.flinkhand.de/index.php?aid=90):

My first result looks like this (the end-result I'll show in another post):

The pattern system at Flickhand site is such, that I must always interpret the pattern for my "hand and body". Let me explain it so you can understand better what I mean by this.
Lets take the pattern for this belt I'm talking about in this posting:
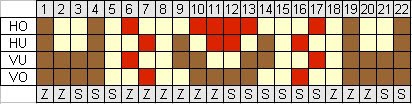 HO = hinten oben = the upper back hole, HU = hinten unten = the lower back hole, VU = vorne unten = the lower front hole, VO = vorne oben = theupper front hole.
I made some drawings about the position of weaver, tablets and where the belt/pattern will form. Please don't rate my drawing skill!:)
At first I will give a mini-glossary of some words used in these drawings:
EDASI - forth
TAGASI - back
EHK - in other words
TOOLI SELJATUGI - backboard of a chair
VÖÖ - belt
VÖÖMÕÕGAKS MUUNDUNUD PUUST PANNILABIDAS - a wooden kitchen spatula which has miraculously transformed into sword beater.
First drawing tries to illustrate version 1 of how weaver and warp and belt are positioned:

As you can see (click on the picture to enlarge it!), the pattern/belt forms at that end of the warp where the tablet-weaver sits. If it's said that the cards must be turned forth (edasi), then you must turn them in the direction where you look, away from yourself. And if the cards must be turned back, then you turn them in the direction of yourself, towards you. In the so-called starting position the tablet/card holes are positioned as follows: HO and HU are the ones nearest to the weaver, VU and VO the ones farthest frome the weaver. This positioning system is one of the most common ones, where A is usually the upper hole nearest to the weaver, B the lower hole nearest to the weaver, C the lower hole farthest from the weaver and D the upper hole fartherst from the weaver.
I use a different positioning system however:
 As you can see from the drawing, in this case the belt/pattern forms at the other end of warp, not near the weaver. Meaning, in MY METHOLOGY everything is REVERSED or opposite.
A is not the hole nearest to you (the weaver), but the upper furthest instead and so on. And if it's said you must turn forward, then you turn away from yourself. And backwards means turning in your direction.
So, basically my warp is set up like this:
 I hope my clumsy drawing is undestandable -- it lacks perspective, I know :). Anyway, as you can see, that end of the warp, where the pattern/belt appears while weaving is tied to a heater. I sit on the chair and the other end of the loom is tied to that chair:

To finish this post, here is an image that first my first try in the beginning stage. Here you can also see some mistakes that happen when your skills are rusty and -- in addition! -- someone comes to draw your attention away:

No comments:
Post a Comment